

I noticed that some WordPress blogs display article PageViews obtained from Google Analytics (GA). I run several Drupal sites (all have GA enabled), so I was curious, if there is any module with similar, handy functionality.
Indeed, there’s one. It’s called Google Analytics Counter module (maintained by Vacilando).
- Installation workflow
- How to connect Google Analytics Counter (GAC) with your Google Analytics account
- Template hacks with GAC module
Installation workflow
In order to make it running follow these steps:
- Download and enable the module as usual. The plugin has no direct required dependency, you only need to use GA as your traffic counter. Basic settings are available under
admin/config/system/google_analytics_counter. - Connect GAC to your GA account. You will need to get Google “Client ID” and “Client Secret“. I have recorded a video tutorial to make it easier for you.
- Edit your theme’s PHP files.
How to connect Google Analytics Counter (GAC) to your Google Analytics account
Here’s a 3 minute video tutorial about how to get the Goolge “Client ID” and “Client Secret” required by the Google Analytics Counter module.
If you cannot watch a video, here’s a step-by-step text-image guide:
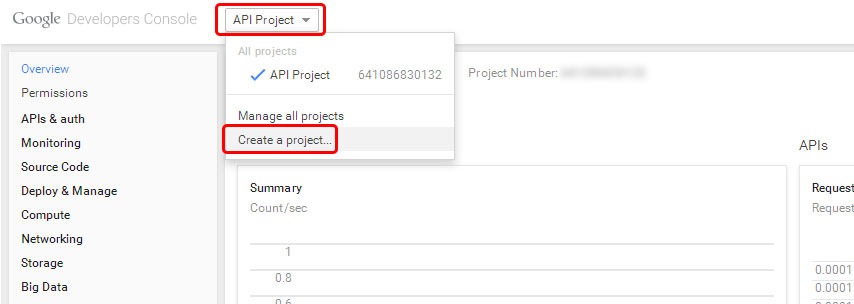
1. Log into your Google account tied with GA and visit the Google API Console. Next to the “Google Developers Console” logo, click on the selection and choose “Create a project…“.
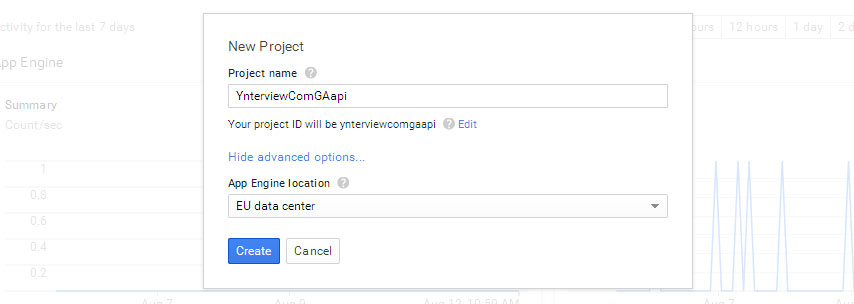
2. Type in a “Project name“. Under “Show advanced options…” you can decide whether “App Engine location” will be in US or EU. My VPS is in Europe, so “EU data center” is closer.
3. As soon as you click on the blue “Create” button, white lightbox will be closed and you will see the status of the activation process in the right-bottom corner of your screen.

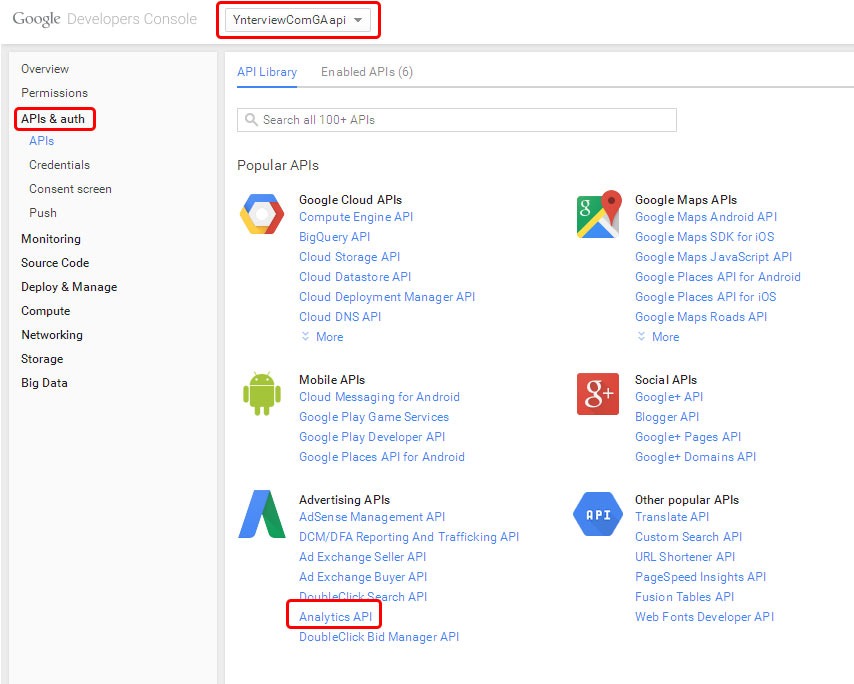
4. When done, you will be automatically redirected inside app’s “Overview” (in my case it’s “YnterviewComGAapi“). Go to “APIs & uuth” > “APIs” and click on “Analytics API“.
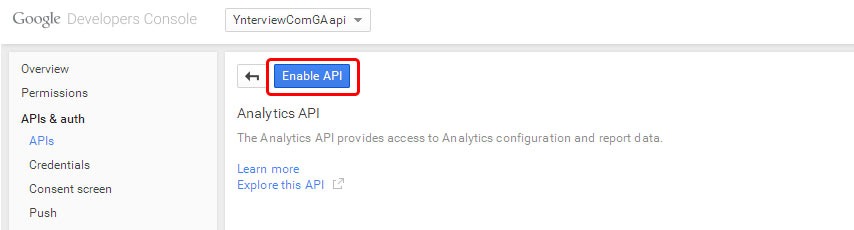
5. Clink on blue “Enable API” button. When button will change from blue to white with the text “API Enabled“, continue to the step 6.
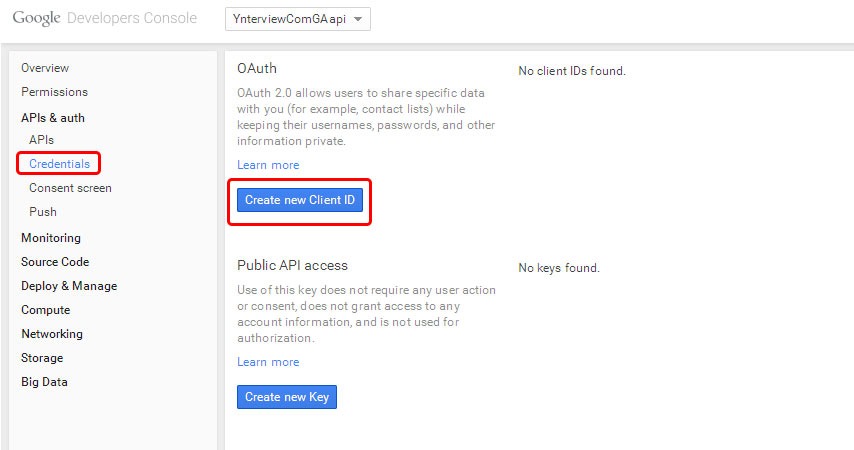
6. Go to “Credentials” click on the “Create new Client ID” button.
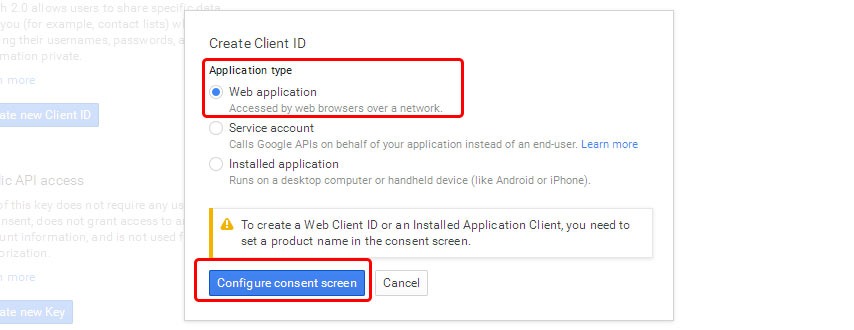
7. Select “Web application” as your “Application type” and clink on the “Configure consent screen” button.
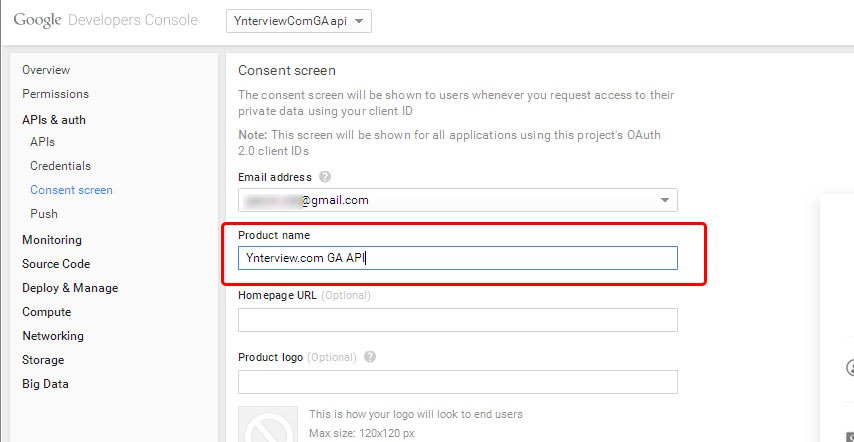
8. Only required field in “Consent screen” page is “Product name“. Don’t waste time filling out other items, nobody except you will ever see this. Click on the blue “Save” button on the bottom of the page.
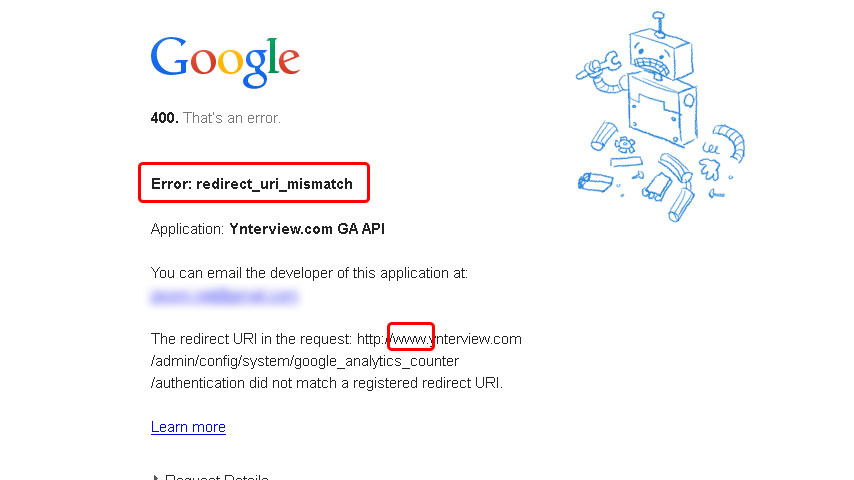
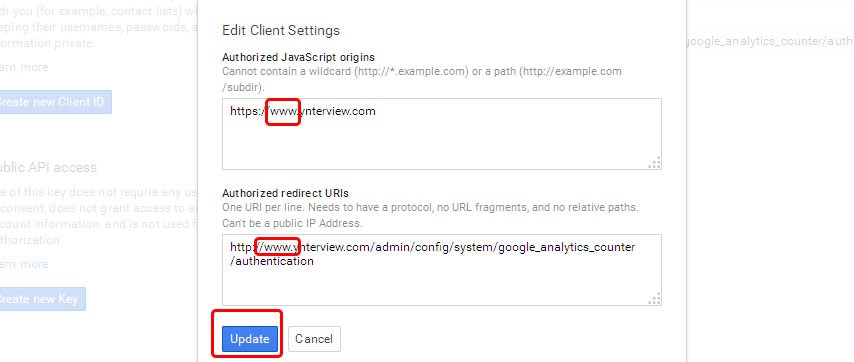
9. You will be again redirected to “Create Client ID” page. Fill our “Authorized JavaScript origins” and “Authorized redirect URIs“. You will find your “Authorized redirect URIs” in Google Analytics Counter’s tab marked as “GA authentication” (admin/config/system/google_analytics_counter/authentication) in the description of “Redirect host” field (search for “Current redirect URI“). It will be something like http://www.example.com/admin/config/system/google_analytics_counter/authentication. When done, click on the “Create Client ID” blue button.
NOTE: I made a mistake and forgot to add “www” in my URL. Later, it will end up with an error message, but let’s continue for now.

10. Now you finally have a “Client ID” and “Client secret” within GAC module.
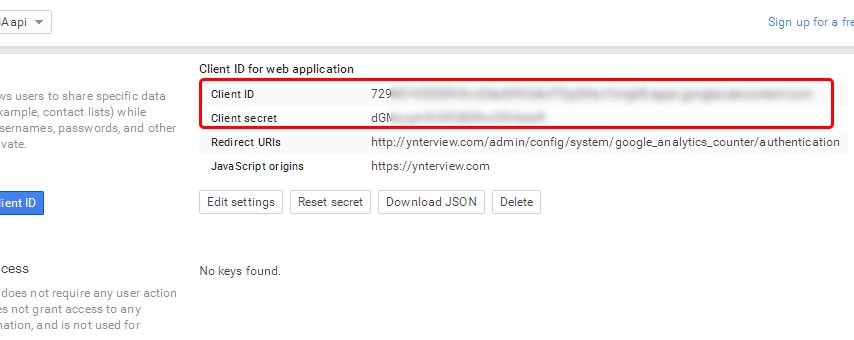
11. Go to “GA authentication” tab in Google Analytics Counter module settings (admin/config/system/google_analytics_counter/authentication), copy “Client ID” and “Client secret“, and then hit the “Start setup and authorize account” button.
If all went well you will see a page like that in step 13. However, as I mentioned in step 9, I made a mistake, and I saw an error page saying “the redirect URI in the request did not match a registered redirect URI” (“www” was missing). I left this mistake as part of the tutorial, because I believe it will be helpful for you.
NOTE: If you are not logged in, you will be asked to log into your Google developer account (account connected with the API).
12. Go back to the page where you copy “Client ID” and “Client secret” from and click on “Edit settings” white button. Fix the settings and click on the blue “Update” button. Refresh (reload, F5) the error page and continue to the next step.
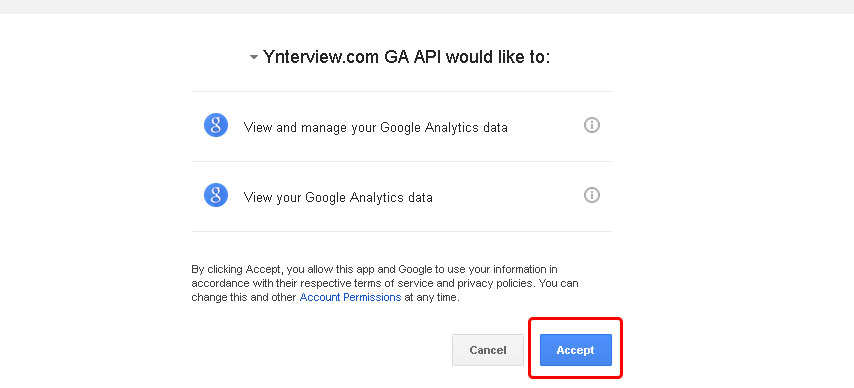
13. Click on the “Accept” button.
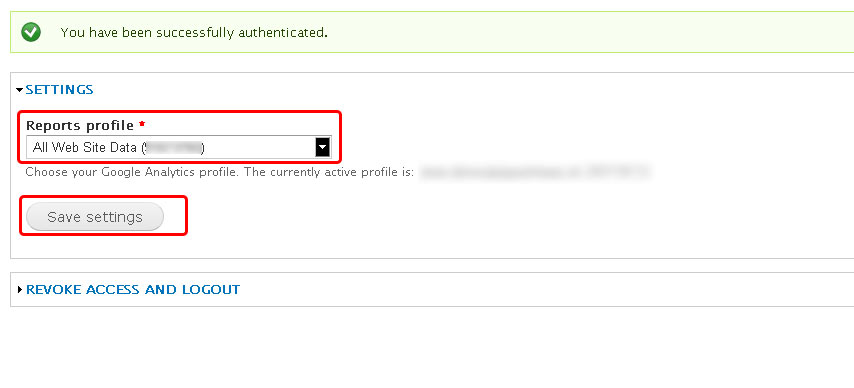
14. That’s it, you have been successfully authenticated. Now select a proper “Report profile” (I have more sites in my GA account), and click on the “Save settings” button.
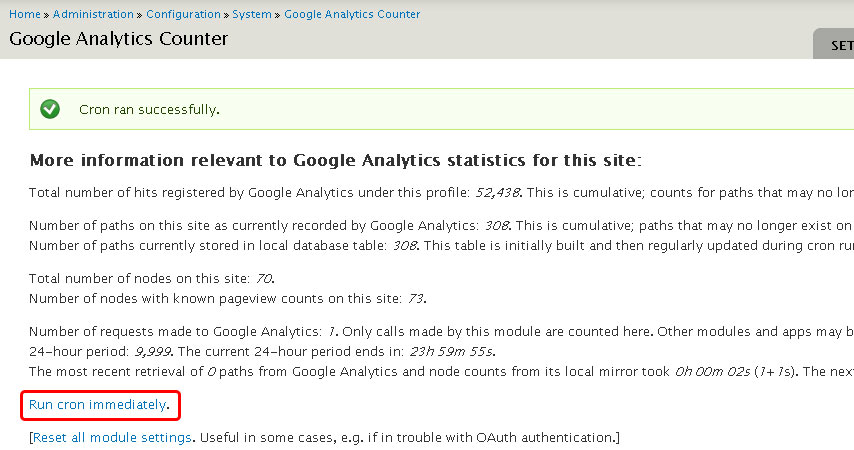
15. Within Google Analytics Counter settings, go to the “Dashboard” tab and click on the “Run cron immediately” link. After a successful Cron run all your Google Analytics statistics will be loaded.
Now, it’s time to edit your theme.
Template hacks with GAC module
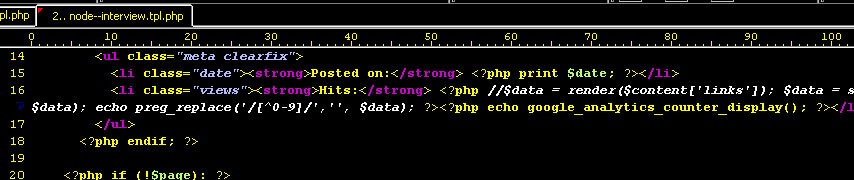
You will find the PHP code samples in Vacilando’s article under the “Usage” section. This is the code I have used in interview–node.tlp.php:
<ul class="meta clearfix">
  <li class="date"><strong>Posted on:</strong> <?php print $date; ?></li>
  <li class="views"><strong>Hits:</strong> <?php echo google_analytics_counter_display(); ?></li>
</ul>
You can see it in practice when you open for example this interview.
Bonus:
GAC module has and an option to count all the PageViews since the GA profile was set up. It’s printed by <?php echo google_analytics_counter_display('all'); ?>. If you’ve noticed Ynterview.com’s footer, there’s a message “Total number of pageviews since Jan 1, 20XX measured by Google Analytics: XXXXXX” generated by GAC module.

This code in page.tlp.php does the trick:
<?php
  $clean_counter = strip_tags(google_analytics_counter_display('all'));
  $clean_minus = 1377; // hits until December 31, 2014
  $clean_counter_actual_year = $clean_counter - $clean_minus;
  print 'Total number of pageviews since Jan 1, 2015 measured by Google Analytics: <strong>'. $clean_counter_actual_year . '</strong>';
  ?>
NOTE: In order to get proper $clean_minus variable go to the Google Analytics and find the number of PageViews for the profile from the beginning to the last day of the previous year. In my case it was 1377 ;-).

There’s also space for more hacks. When you have a total number of PageViews for current year, you can count the number of days from the beginning of the year until today, divide the values, and find the average daily traffic…
Conclusion
Thanks to Vacilando for a module maintenance. That’s all 🙂
Leave a Reply